Alias Manager (Enterprise)
Overview
You can use the Alias Manager to "merge" multiple entities that actually represent the same person/place/etc OR to discard unwanted entities.
One of the key features of aliasing is that no data is modified. The aliasing function sits in between the raw data and the API and modifies the objects "in flight". This makes it very flexible: different users on the same platform can have different sets of aliases. In addition it makes it safer to experiment, since none of your raw data can be corrupted.
Using the Widget
The Alias widget has the following principle use cases, as illustrated in the video below
- Merging Duplicate Entities
- Discarding Entities
- Filtering Classes of Entities or Associations
Merging Duplicate Entities
In some cases, the same entity will be returned multiple times, due to disambiguation failure or multiple social media presences. In these cases, you can specify a master entity and its aliases, in order to filter the results to display only the desired entities.
To specify the master entity and its aliases
- After running your query, open the Alias manager widget so that it is available from the workspace.
- Enter the entity term in the Filter/Add Entities search box.
- Click and drag the desired master entity into the Master Entity list on the right.
- Click and drag each duplicate entity into the Alias list.
- Save and re-query. After the Alias settings have had time to propagate you will notice that any open visualization widgets (eg. Entity Significance) are modified so that the duplicate entities are removed.
Discarding Unwanted Entities
In some cases, you may want to discard an Entity all together. This can be the case if NLP has incorrectly identified an entity type.
This is non-destructive and does not corrupt or delete your data.
To discard the entity
- After running your query, open the Alias manager widget so that it is available from the workspace.
- Enter the entity term in the Filter/Add Entities search box.
- Under the Master Entity list click on DISCARD
- Click and drag, the Entity to be discarded to the Alias list.
- Save and re-query. The entity is removed from any widget visualizations.
Removing Entire Classes of Entities and Associations
Sometimes you will want to remove entire classes of entities or associations all together. For example, you may want to remove an entire set of Entity types (eg. Topic) from the query results. For the purpose of example, we will remove the Entity Type "Topic" from the query results.
To remove the class of entity
- From the Workspace, click on Options>Advanced Options.
- Scroll down to Entity filter and enter the value "-topic"
- Return to the workspace, save, and re-query. Any open visualization widgets are updated with entities of type "topic" removed.
Combining Multiple Alias Sets
All of the sets of aliases from the different configurations across the different communities that are being searched are combined. If you do not search over a community then any aliases saved in that community are not applied.
As a result, if you place an alias set in a community with no data in it then you can choose whether or not to apply it at query time just by either including the community or not from the source manager.
To combine alias sets
- Create a set of aliases that you would like to apply against a set of source data located in communities.
- Create one of the alias sets in a community with no source data.
- Apply the alias settings you created in step 2, by including its community before executing your query.
In this way, you can experiment with applying various alias sets over an identical data set.
About Alias Sets
Each community can have both a primary alias set and shared alias sets. Alias sets can be uploaded to the platform using the File Uploader and then shared with various communities as JSON shares. The primary alias set is shown by default on the Alias Manager interface for the selected Community. It is also possible to view all shared alias sets by enabling the parameter "Show Shared Aliases."
Creating Synthetic Alias Masters
It will be often the case that the desired "master" entity will not actually be present in the data.
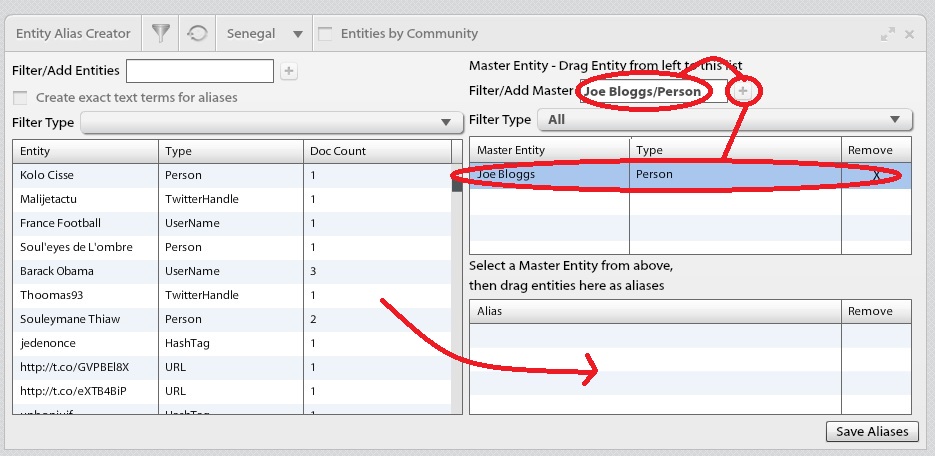
For example, if you have a reddit and a twitter author who you believe to be the same person, you will have their handles as TwitterUser and RedditUser respectively (eg "joeOnTwitter" and "blogs_the_blogger"). If you can infer their name from the posts then you might want to make that the master entity, eg "Joe Blogs/Person" with "joeOnTwitter/TwitterUser" and "blogs_the_bloggetr/RedditUser" as aliases, even though "Joe Blogs" never appears in the content.
To create the synthetic alias master
- In the widget, type the entity name, "/" then the desired entity type in the "Filter/Add Master" text box (see screencap below; ignore the fact that it will temporarily filter the other masters out),
- Click on the "+" button.
- Select the created master entity and then drag aliases from the table on the left,
- Save and re-query.
Creating "Text" Aliases
Creating master:alias sets actually does two things:
- Aliases are merged into the master entity during the query
- Queries involving the master entity are expanded to include the master's aliases
Sometimes this expansion is not sufficient. For example, some of the data might not have had any entities extracted at all (eg it presents the data in bullets that the NLP cannot parse). To address this sort of issue, the Entity Alias Builder widget also allows you to add arbitrary text to the expansion, which is converted to full text searches, ie will bring back documents regardless of the entity extraction quality/completeness.
To create the text alias
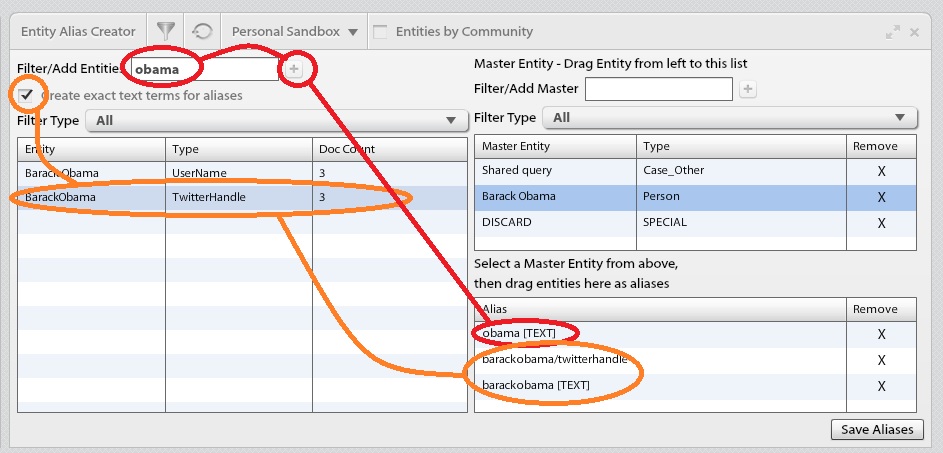
- Type the desired text into the "Filter/Add Entities" text box on the right (ignore that it filters as you type)
- Click the the "+" button next to it.
Alternate Method
- Tick the "create exact text terms for aliases"
- Drag aliases across as normal, with the checkbox ticked 2 aliases are created: the normal entity and also the text of the entity name.
see orange highlighting in the screen cap
In this section:
Related Reference Documentation: