Case Visualizer (Enterprise)
Overview
The Case Visualizer widget allows you to visualize and communicate key relationships between entities.
About Cases
A Case is a way of segmenting the source data in a community. A case could be an investigation into a subset of entities, a repository of interesting activity pertaining to a specific subject, or a sub-set of similar documents which you would like to group together.
Using the Widget
You can use the Case Visualizer widget to view the relationships between multiple entities. You can import these relationships to the widget using drag and drop from many of the other widgets (eg. Document Viewer, Entity Significance, Event Graph).
Creating a New Case
To start building up a case, you will need to create a new case from the widget before populating it with entity relationships.
To create a new case
- From the widget click on the Case dropdown
- Click on Add New Case
- Provide a Name and Parent Community (optional).
- Click on Create.
A new blank case is prepared.
Adding Entity Relationships to the Graph
The following widgets support adding entity relationships to the Case Visualizer using drag and drop:
To add entity relationships to the Case Visualizer
From a supported widget, select the data to drag (for the precise procedure see the individual widget pages as specified above).
Click on the "Drag+Drop" icon (
 ), in order to drag and drop the entities into the visualization workspace. A dialogue box is displayed prompting you to accept the creation of a specific amount of entity relationships and nodes.
- Click on Ok.
The entity relationships are displayed on the visualization workspace.
Manually Adding a Node
In some cases you will want to manually add a Node to the graph, and indicate a relationship yourself.
The following node types are supported: Person, Document, Organization, Place, Default, Note.
To manually add a node
Click the desired note type on the editor menu and drag onto the graph.
Mouse-over a node on the graph.
Click + drag from one of the edge circles.
Drop + click desired node type.
The new node is added to the page and the relationship to the other entity is indicated using horizontal and vertical lines.
Deleting Nodes
To delete a node
- Click on the node to select it.
- Press the delete button on your keyboard.
The node is deleted from the visualizer workspace. Any connective lines are also deleted.
Designating a Node as Target for Documentation
From the Case Visualizer widget it is possible to build up a case, using the documents that are returned by your queries. Using the widget you can call out specific entities, associations and documents for further attention, and use notes and properties to foster collaboration between users. You can also target specific nodes from the case visualizer widget and send them to the advanced documentation management capabilities of the Case Manager.
To designate a node as target for the Case Manager documentation manager
- Toggle the Editor menu from right panel.
- Scroll down to Properties.
- Click on Convert to Target.
This prompts the platform to populate the node in the Case Manager, in order to harness more advanced documentation management capabilities.
TODO: add link to Case Manager documentation.
As you create a link diagram, convert entities (nodes) to 'Targets' to create a profile in the case folder: this archives the query used to locate the entity or the document the entity was pulled from, and provides a space for analysts to comment and add manual relationships.

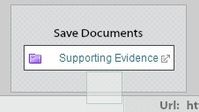
Documents related to the case can be dropped onto the middle of the graph and saved as 'Supporting Evidence' in the case folder.
Changing a Node icon to a VCard and Entering Notes
To change the node icon
- Toggle the Editor menu from right panel.
- Scroll down to Style.
- Check vcard.
- Scroll down to Properties.
- Enter notes in the vcard text box.
Adding URLs to a Node
You can add additional URLs to a node.
To add a URL
- From the Editor, scroll down to add URLs
- Click the plus sign and enter the URL. The new URL is now associated with the Node.
Taking a Snapshot
In some cases you may want to save a snapshot of your case work, perhaps to return to a meaningful marker in time.
To create a snapshot
- Click on Snapshot>Save Snapshot.
- Provide a name and Previous Snapshot, if applicable.
- Click on Save.
Exporting and Importing Cases
Exporting a Case
Once you have worked on a case to a certain point you may want to export it
To export a case
- Click on the "Export/Import" dropdown in the widget
- Select the desired export option
- Choose the desired format and destination.
- Click on Save.
Importing a Case
To import a case
- Click on the "Export/Import" dropdown in the widget
- Click on Import XML.
- Select an XML file.
- Click on Open.
Using the Time Slider
TODO
Merging Graphs
TODO
In this section:
Related User Documentation:
Useful Shortcuts:
- Ctrl or Apple Cmd or Shift - Multiselect
- Ctrl or Apple Cmd and Z - Undo
- Ctrl or Apple Cmd and Y - Redo
- Ctrl or Apple Cmd and G - Group/Ungroup current selection
- Ctrl or Apple Cmd and Spacebar - Center
- Ctrl or Apple Cmd and S - Force Save
- Ctrl or Apple Cmd and R - Relayout
- Ctrl or Apple Cmd and Delete or Backspace - Clear
- Ctrl or Apple Cmd and A - Add 10 nodes
Some Apple Cmd commands will not work because Mac Browser's receive the keyboard events first.