Overview
The Plugin Manager provides a simple web-based user interface for uploading new and updated map reduce plugins and saved queries to the system, and for sharing them across the different communities.
If you want to use a map reduce plugin for many jobs, use the file uploader to upload the jar once and then use this plugin Manager to schedule each job that uses the common jar.
A built-in "Javascript Engine" plugin is provided that allows users to write javascript "scriptlets" and distribute them. This is described here.
The Plugin Manager GUI is not currently compatible with IE. It is compatible with Chrome, Firefox, and Safari.
Authorization Requirements:
Only Administrators can upload JARs to be used by the Plugin Manager.
Any user can run jobs based on JARs to which they have access.
Using the Plugin Manager
Logging In
The Plugin Manager shares its cookie with the main GUI, the file uploader, the source builder, and the person manager - logging into any of them will log into all of them.
To login
- Provide your credentials when prompted by any of the above mentioned GUIs.
Root URL Access
The Plugin Manager can be accessed from the root url by using the following format:
<ROOT_URL>/manager/pluginManager.jsp
eg http://infinite.ikanow.com/manager/pluginManager.jsp).
This brings up username and password fields and a login button
The following URL parameters are supported:
- Use "?sudo" to view jobs you don't own but which are shared with you (or all jobs if you are an admin), eg http://infinite.ikanow.com/pluginManager.jsp?sudo
.
Scheduling a New Map Reduce Plugin
You can use the Plugin Manager to schedule a new MapReduce plugin job
To upload a plugin,
- Fill in the fields, as per your requirements
- Select the file from your hard drive and network drives, and select "Submit" or "Quick Run."
You can select either a single or multiple (CTRL+click) communities. You can share plugins with any available community. If you upload to only your personal community, only you (and system administrators) will have access to the file.
For more information concerning the functionality of the individual fields, see section Plugin Manager Interface.
Submit vs Quickrun:
There are 2 options for submitting a job:
- Submit (button to the right of "Title")
- QuickRun (button to the right of "Frequency")
Submit will save the task (or update it if it already exists). If the frequency is not "Never" and the "Next Scheduled Time" is now or in the past, then job is immediately scheduled. The page refreshes immediately (unlike "QuickRun" below) and the progress can be monitored.
"QuickRun" will set the frequency to "Once Only" and the time to "ASAP" (as soon as possible) and then will do 2 things:
- Submit as above
- It will wait for the job to complete before refreshing the page (all the "action" buttons are disabled in the meantime). You can't see the progress (see below) in the meantime, so this is best used on smaller jobs.
Debugging New and Existing Tasks
Just above "user arguments" there is a "Save and debug" button. This is very similar to pressing the "QuickRun" button except:
- It will only run on the number of records specified in the text box next to the button.
- It will always run the Hadoop JAR in "local mode" (ie it won't be distributed to the Hadoop cluster, if one exists).
If running in local mode, then "QuickRun" will log error messages - nothing will be currently logged in the typical cluster mode though, so the debug mode is necessary in this case - the alternative is running and testing in eclipse as described here, which is quite involved)
To debug a new or existing task
- Fill in the fields, as per your requirements
- Specify the number of records in the text box
- Click on save and Debug.
Any log messages output by the Hadoop JAR (or in the javascript if running the prototype engine) are collected and output to the status message.
Stopping a Running Task (kill)
You can use the plugin manager to stop a running task.
To stop a running task
- Set the "Frequency" to "Don't Run"
- Click Submit. It may take up to a minute for the status to be returned.
Scheduling a New Saved Query
You can use the Plugin Manager to schedule a saved query instead of a map reduce plugin
To schedule a new saved query
- Select the "query only" option for the JAR (select "re-use existing JAR" first)
- Leave Mapper, Combiner, and Reducer class blank
- Submit a valid query for the query field.
A good place to start is saving queries from the GUI under the Advanced -> Save option. These can be pasted into the query or "User arguments" field.
Unlike the normal map/reduce case, the query in this instance must be an Infinit.e query, not a MongoDB query).
You can also paste a saved workspace link into the query field (eg from the GUI) instead of typing out the JSON.
Editing Existing Plugins/Saved Queries
After log-in, all plugins you own can be seen from the top drop-down menu (initially called "Upload New File"). You can also see all plugins in your community (see info box below). If you an administrator, all plugins in the system can be seen. You can only edit plugins if you admin/community moderator/owner though you can see the results of any plugin in the dropdown.
Apart from HadoopJavascriptTemplate, by default only shares you own are visible (this will be fixed in a future release), even as admin/moderator - to see all plugins you can access via the API, add "&sudo" to the URL (eg "http://localhost:8080/manager/pluginManager.jsp?sudo").
To edit an existing plugin
- Select the file from the "upload new plugin" dropdown.
- Make the required changes to the fields.
- Click on Submit.
Copying an Existing Custom Task
You can use the Plugin Manager to copy an existing task
To copy the task
- Select the task to be copied from the top drop down menu.
- Select "Copy Current Plugin". You must change the title.
Deleting files
You can use the Plugin Manager to delete files
To delete the file
- Select the file to be deleted from the top drop down menu.
- Click on Delete.
Running an Existing Job
To run the job
- For the parameter Next scheduled time provide a value of "Once Only." The job will be scheduled as soon as possible and only run once. If you want to schedule a job on a certain frequency you can adjust the frequency option to one of the other settings.
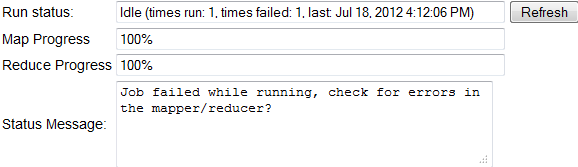
Following a Job's Progress
Once a job has been scheduled you will be able to track its progress.
To track job progress
- Click the Refresh button next to "Run status." The current map and reduce completion status as well as any errors that may have occurred when running are displayed in an informational header.
In this section: