Overview
The Plugin Manager GUI is not currently compatible with IE. It is compatible with Chrome, Firefox, and Safari.
The plugin manager provides a simple web-based user interface for uploading new and updated map reduce plugins and saved queries to the system, and for sharing them across the different communities.
If you want to use a map reduce plugin for many jobs, use the file uploader to upload the jar once and then use this plugin Manager to schedule each job that uses the common jar.
Logging In
The plugin manager can be accessed from <ROOT_URL>/manager/pluginManager.jsp (eg http://infinite.ikanow.com/manager/pluginManager.jsp). It can also be reached from the home page of the Manager webapp (itself linked from the main visualization GUI).
The following URL parameters are supported:
- Use "?sudo" to view jobs you don't own but which are shared with you (or all jobs if you are an admin), eg http://infinite.ikanow.com/pluginManager.jsp?sudo
This brings up username and password fields and a login button. (Unless already logged in, eg into the manager or main GUI - in which case skip to the next section).

Note that:
- The plugin manager shares its cookie with the main GUI, the file uploader, the source builder, and the person manager - logging into any of them will log into all of them.
Scheduling a new Map Reduce Plugin

The above figure shows the tool shortly after log-in.
To upload the plugin, simply fill in the fields, select the file from your hard drive and network drives, and select "Submit".
Note that you can select either a single or multiple (CTRL+click) communities. You can share plugins with any available community. If you upload to only your personal community, only you (and system administrators) will have access to the file.
The "query" field has a few noteworthy points:
- It can be provided in 2 formats:
- A single JSON object containing a MongoDB query (see next bullet), eg "{ 'docGeo': { '$exists': false } }"
- An array of 2 JSON objects, the first of which is the above query object, the second of which controls the sorting and size of the output (see this tutorial for the format, under advanced topics, or the schedule/update API calls).
- An array of 3 JSON objects (the second can be null), where the third object is a list of fields to be returned (in standard MongoDB "projection" format, eg "{ <fieldname>:[1|0] (, <fieldname>:[1|0])* }"
- The aforementioned query must be a MongoDB query (use the /wiki/spaces/INF/pages/4358642, or content format), Infinit.e queries are not currently supported (this functionality is coming).
Note: If you set append results to false, there is no need to set an age out.
Note: If you don't want your job to depend on another jobs completion, do not select any job depenencies (you can CTRL-click to remove selected options if necessary).
Note: the "user arguments" field can be any string, it is interpreted by the code in the Hadoop JAR. For custom plugin developers: see this tutorial for a description of how to incorporate user arguments in the code (under advanced topics).
Note: You can temporarily remove a combiner or reducer by putting "#" in front of it.
Scheduling a new Saved Query
If you want to schedule a saved query instead of a map reduce plugin you can follow the exact same process as scheduling a m/r job except for these few changes:
- Leave JAR file blank
- Leave Mapper, Combiner, and Reducer class blank
- Submit a valid query for the query field, a good place to start is saving queries from the GUI under the Advanced -> Save option. These can be pasted into the query field. (Note unlike the normal map/reduce case, the query in this instance must be an Infinit.e query, not a MongoDB query).
Editing existing plugins/saved queries
After log-in, all plugins you own can be seen from the top drop-down menu (initially called "Upload New File"). If you are a community owner or moderator, all plugins in your communities can be seen in addition. If you an administrator, all plugins in the system can be seen.

Once a file has been chosen, it can be modified by changing the fields (and/or choosing a different file), and then selecting the "Submit" button.
Deleting files
Log in and choose a file as above, then select the "Delete" button.
Running an existing job
If you want to start a job you can select for the option "Next scheduled time" to Once Only and it will be scheduled as soon as possible and only run once. If you want to schedule a job on a certain frequency you can adjust the frequency option to one of the other settings.
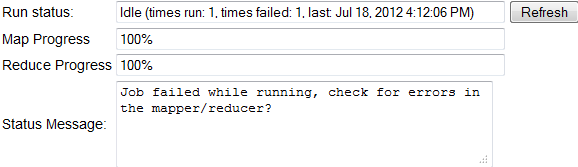
Following a jobs progress
Once a job has been scheduled you will be able to track its progress by refreshing next to the run status, the current map and reduce completion status as well as any errors that may have occurred when running will be displayed in an informational header.